
Updated July 21, 2026 to reflect current Exegol images, MCP configuration, and teardown guidance.
Whether you’re running one Kali VM across multiple HTB machines, client engagements, or exam attempts — you’ve probably felt the friction. Stale tools from a bad upgrade. Shell history from three engagements ago. That one /etc/hosts entry you forgot to clean up before starting a new client. BackTrack and Kali served me well for fifteen years, but the single-box model wasn’t built for the way modern operators actually work: concurrent engagements, strict data separation, reproducible environments, and zero tolerance for “it worked on my box.”
I needed something purpose-built for operators. That’s Exegol.
In my operator workflow post, I teased that Exegol was the second most-used thing in my command history — more than git, more than Kali directly. This is the deep dive into why, and how I’ve customized it into a portable offensive operations platform.
What Is Exegol
Exegol is a community-driven offensive security environment built on Docker. Instead of maintaining a monolithic OS, you work in purpose-built containers that come pre-loaded with curated, tested security tools.
The project has three parts:
-
Docker images — pre-built environments with hundreds of tools, available in curated variants:
full— the kitchen sink: AD, web, C2 frameworks, OSINT, wordlists, cracking, mobilead— Active Directory focused with networking toolsweb— web app testing with code analysisosint— open source intelligencelight— base tools plus the most commonly used packages
The current
fullimage includes all tools supported by Exegol. The Communityfreeimage is equivalent tofull, but trails it by a few versions. The specialized images trade breadth for a smaller, purpose-focused environment. -
Python wrapper — a CLI (
exegol start,exegol stop,exegol remove) that makes Docker feel like managing VMs. VPN passthrough, GUI forwarding, workspace mounting — all handled transparently. -
my-resources — a shared volume between your host and every container for persistent customization. This is where the magic lives.
A note on licensing. Exegol began transitioning from GPL3 to the Exegol Software License (ESL) on June 5, 2025. Code released before that date remains GPL3; later code may be ESL or GPL3 when it contains or derives from GPL3 code. There are three tiers:
- Community (free) — non-commercial use only: learning, research, CTFs, academic work. You get the
freeimage, which contains the same tools asfullbut runs a few versions behind. No access to specialized images (ad,web,osint,light) or nightly builds. - Pro — for professional use: pentest engagements, bug bounty, commercial operations. Gives access to all image variants at current versions plus nightly builds.
- Enterprise — team management, multiple seats, dedicated support.
If you’re an HTB student or building skills in a home lab, the Community tier covers that non-commercial use. For professional or other commercial work, the current license requires a Pro or Enterprise subscription. Check the official terms before relying on a summary in a blog post.
Regardless of tier, the workflow is the same: spin up a container per engagement and remove it when you’re done. That sharply reduces accidental cross-engagement state, but it does not eliminate every shared boundary: host-mounted workspaces, my-resources, Docker state, and intentionally shared files persist outside the container.
Why I Switched
The breaking point wasn’t a single event — it was accumulated friction.
Engagement isolation. On a long-lived Kali VM, every engagement can share the same filesystem, /etc/hosts, packages, and shell history. Exegol gives each client a separate container filesystem. exegol remove disposes of that container, while the mounted workspace and shared resources remain visible on the host by design. Teardown still requires checking those persistent locations, credentials, VPN material, logs, and Docker state.
Reproducibility. A pinned image version gives you a consistent base. Pin the versions, tags, or commits installed by your bootstrap too; mutable installers and latest tags can still drift. With both layers controlled, handoffs and parallel instances become far easier to reason about.
Speed. A new Exegol container is ready in seconds. A fresh Kali VM takes minutes to boot, longer to customize. When your engagement starts in an hour and you need a clean environment, seconds matter.
Portability. I develop on macOS and operate in Linux containers. My dotfiles, tools, and customizations follow me through one mechanism: my-resources. Host-native applications such as Obsidian remain outside the container while the engagement tooling stays inside it.
Trade-offs
Exegol isn’t a silver bullet. Some things to know before you commit:
- Initial image download. The
fullimage is large — expect a multi-gigabyte pull on first install. - Docker learning curve. If you’ve never touched Docker, there’s a ramp-up. Exegol’s wrapper abstracts most of it.
- GUI tools require extra setup. Exegol supports both X11 forwarding and a browser-based desktop mode. Neither is quite the same as running Burp Suite natively on a Kali desktop, but desktop mode gets close — more on this below.
- macOS overhead. Docker on macOS runs a Linux VM under the hood (via Docker Desktop or OrbStack). There’s a small performance tax compared to running on a native Linux host, though OrbStack has narrowed this gap significantly.
my-resources: The Architecture
This is the single most important concept in Exegol and the reason my setup works.
~/.exegol/my-resources/ on your host mounts to /opt/my-resources/ inside every container. Anything you put there persists across container lifecycles. Create a new container — your tools, configs, scripts, and customizations are already there.
Here’s what mine looks like:
~/.exegol/my-resources/
├── bin/                              # Custom scripts & tools
│   ├── pentest_workspace_setup.sh    # Engagement lifecycle manager
│   ├── [CLASSIFIED]                  # Unreleased tool — stay tuned
│   ├── first-blood                   # First-boot quick setup like setting pwd
│   └── ...
└── setup/                            # Configuration & first-boot
    ├── load_user_setup.sh            # Bootstrap script (runs once per container)
    ├── apt/
    │   └── packages.list             # APT packages to auto-install
    ├── zsh/
    │   ├── zshrc                     # 555 lines of shell config
    │   └── .p10k.zsh                 # Powerlevel10k prompt theme
    ├── claude/
    │   ├── CLAUDE.md                 # AI assistant guidelines
    │   └── commands/                 # Custom Claude Code commands
    ├── arsenal-cheats/               # 170+ cheatsheet entries
    └── ...
The directory is git-backed. Every change is tracked, versioned, and portable. Clone it on a new machine and your entire operator environment comes with it.
The container is disposable. The configuration is permanent.
The Bootstrap: load_user_setup.sh
Exegol’s my-resources system has a hook: setup/load_user_setup.sh runs once on first container startup. This is where the container transforms from a stock Exegol image into my environment.
Here’s what mine does (abbreviated — the full script is ~200 lines):
# Modern shell tools
cargo install eza --locked            # ls replacement with locked dependencies
curl -LsSf https://astral.sh/uv/install.sh | sh  # Fast Python installer

# fd-find installs as 'fdfind' on Debian — symlink to 'fd'
ln -sf "$(command -v fdfind)" "$HOME/.local/bin/fd"

# Offensive tooling via pipx (isolated installs)
pipx install git+https://github.com/BLTSEC/NOCAP.git # Command capture (my tool)
pipx install evil-winrm-py           # Windows remote management
pipx install httpie                   # HTTP client
pipx install shell-gpt               # AI shell integration
pipx install --suffix=-0924 \
  git+https://github.com/fortra/impacket.git@impacket_0_9_24

# Prompt & theme — install p10k and load it through supported zsh hooks
git clone --depth=1 https://github.com/romkatv/powerlevel10k.git ...

# AI integration — install Claude Code, symlink settings & commands
curl -fsSL https://claude.ai/install.sh | bash

# <...snip...>
The snippet is abbreviated. In the live bootstrap, dependencies that matter to repeatability should be pinned to reviewed versions, tags, or commits; version-controlling an installer is not enough if every dependency it fetches is mutable. I also use Exegol’s supported setup/zsh/zshrc append hook rather than replacing /root/.zshrc, which would prevent some upstream configuration updates from applying.
The result: every new container runs the setup once and converges on my environment. Powerlevel10k prompt. Modern tools. NOCAP ready. Claude Code configured. Same operating pattern across containers, with exact repeatability determined by the versions I pin.
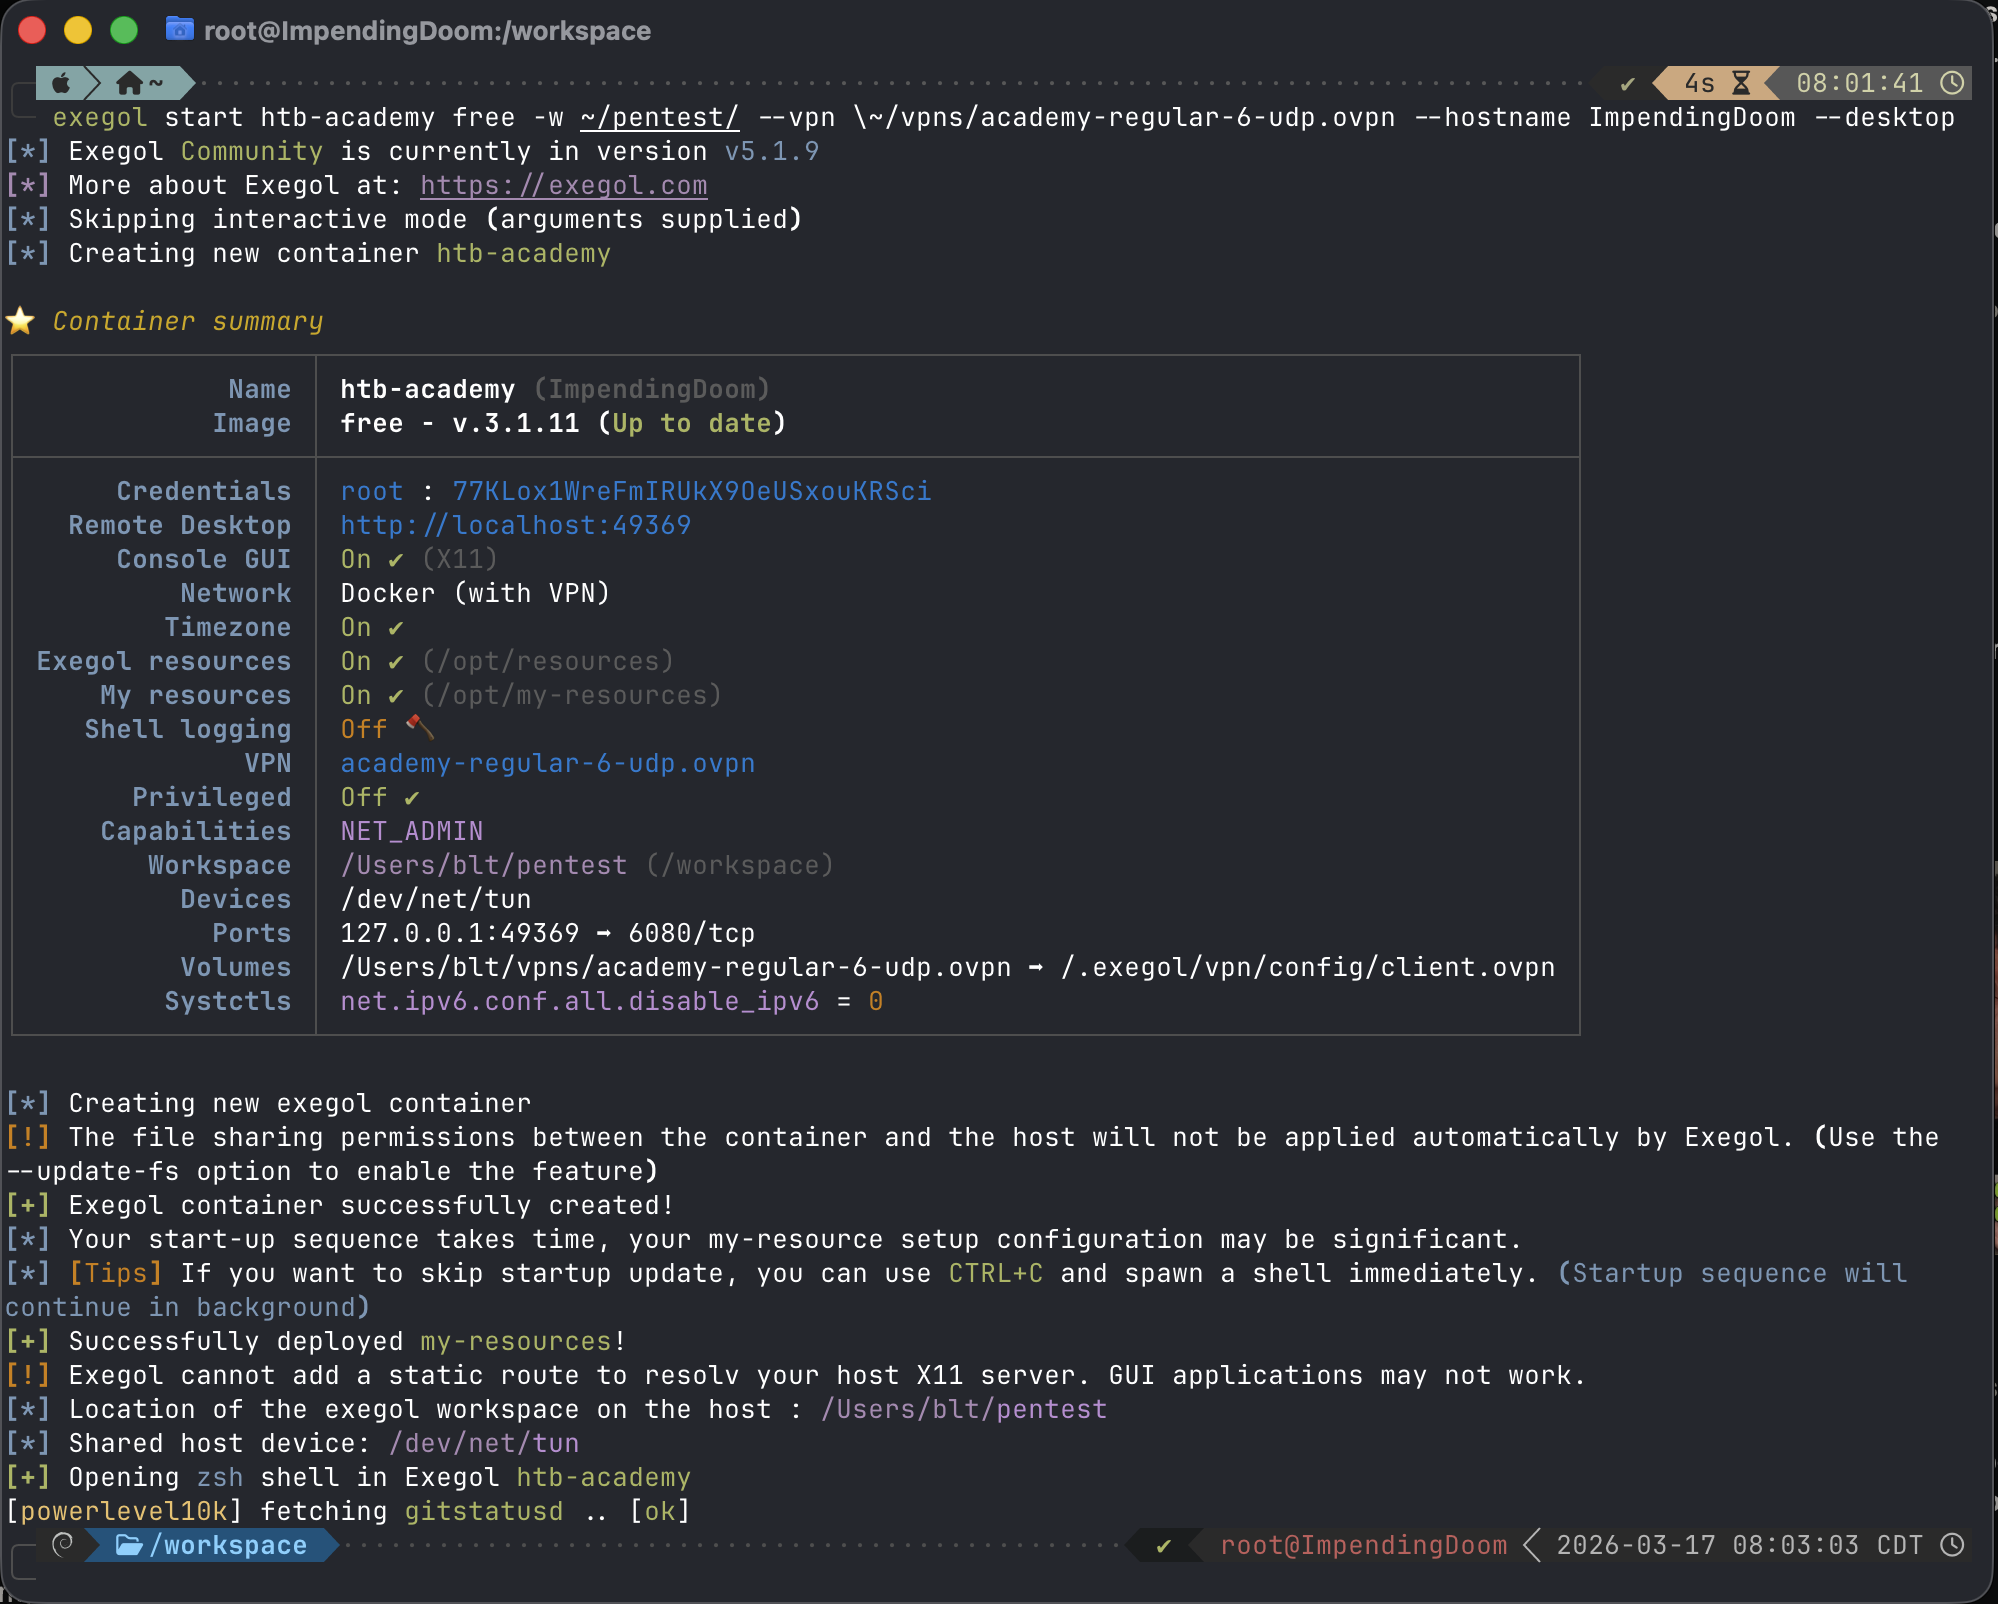 Creating an Exegol container for HTB Academy — free under the Community tier for non-commercial use
Starting an Engagement
Here’s what an engagement actually looks like, start to finish.
Spin Up
exegol start clientA full -w ~/engagements/clientA --vpn ~/vpn/client.ovpn
One command. Exegol creates a container from the full image, mounts the engagement directory at /workspace, establishes the VPN tunnel inside the container (host traffic unaffected), and drops me into a shell. My entire my-resources customization is already there.
Create the Workspace
Inside the container, my pentest_workspace_setup.sh takes over:
start_op 10.10.10.5
This creates a tmux session named op_10_10_10_5 with a structured workspace:
/workspace/10.10.10.5/
├── recon/
├── exploitation/
├── loot/
├── screenshots/
├── reports/
└── logs/20260313/
    └── session_143105.log
Every pane auto-logs. File names include the window and pane names for context: recon_nmap-initial_p0_143105.log. Create a new tmux window or split a pane — logging starts automatically. No manual setup. No forgotten logging flags.
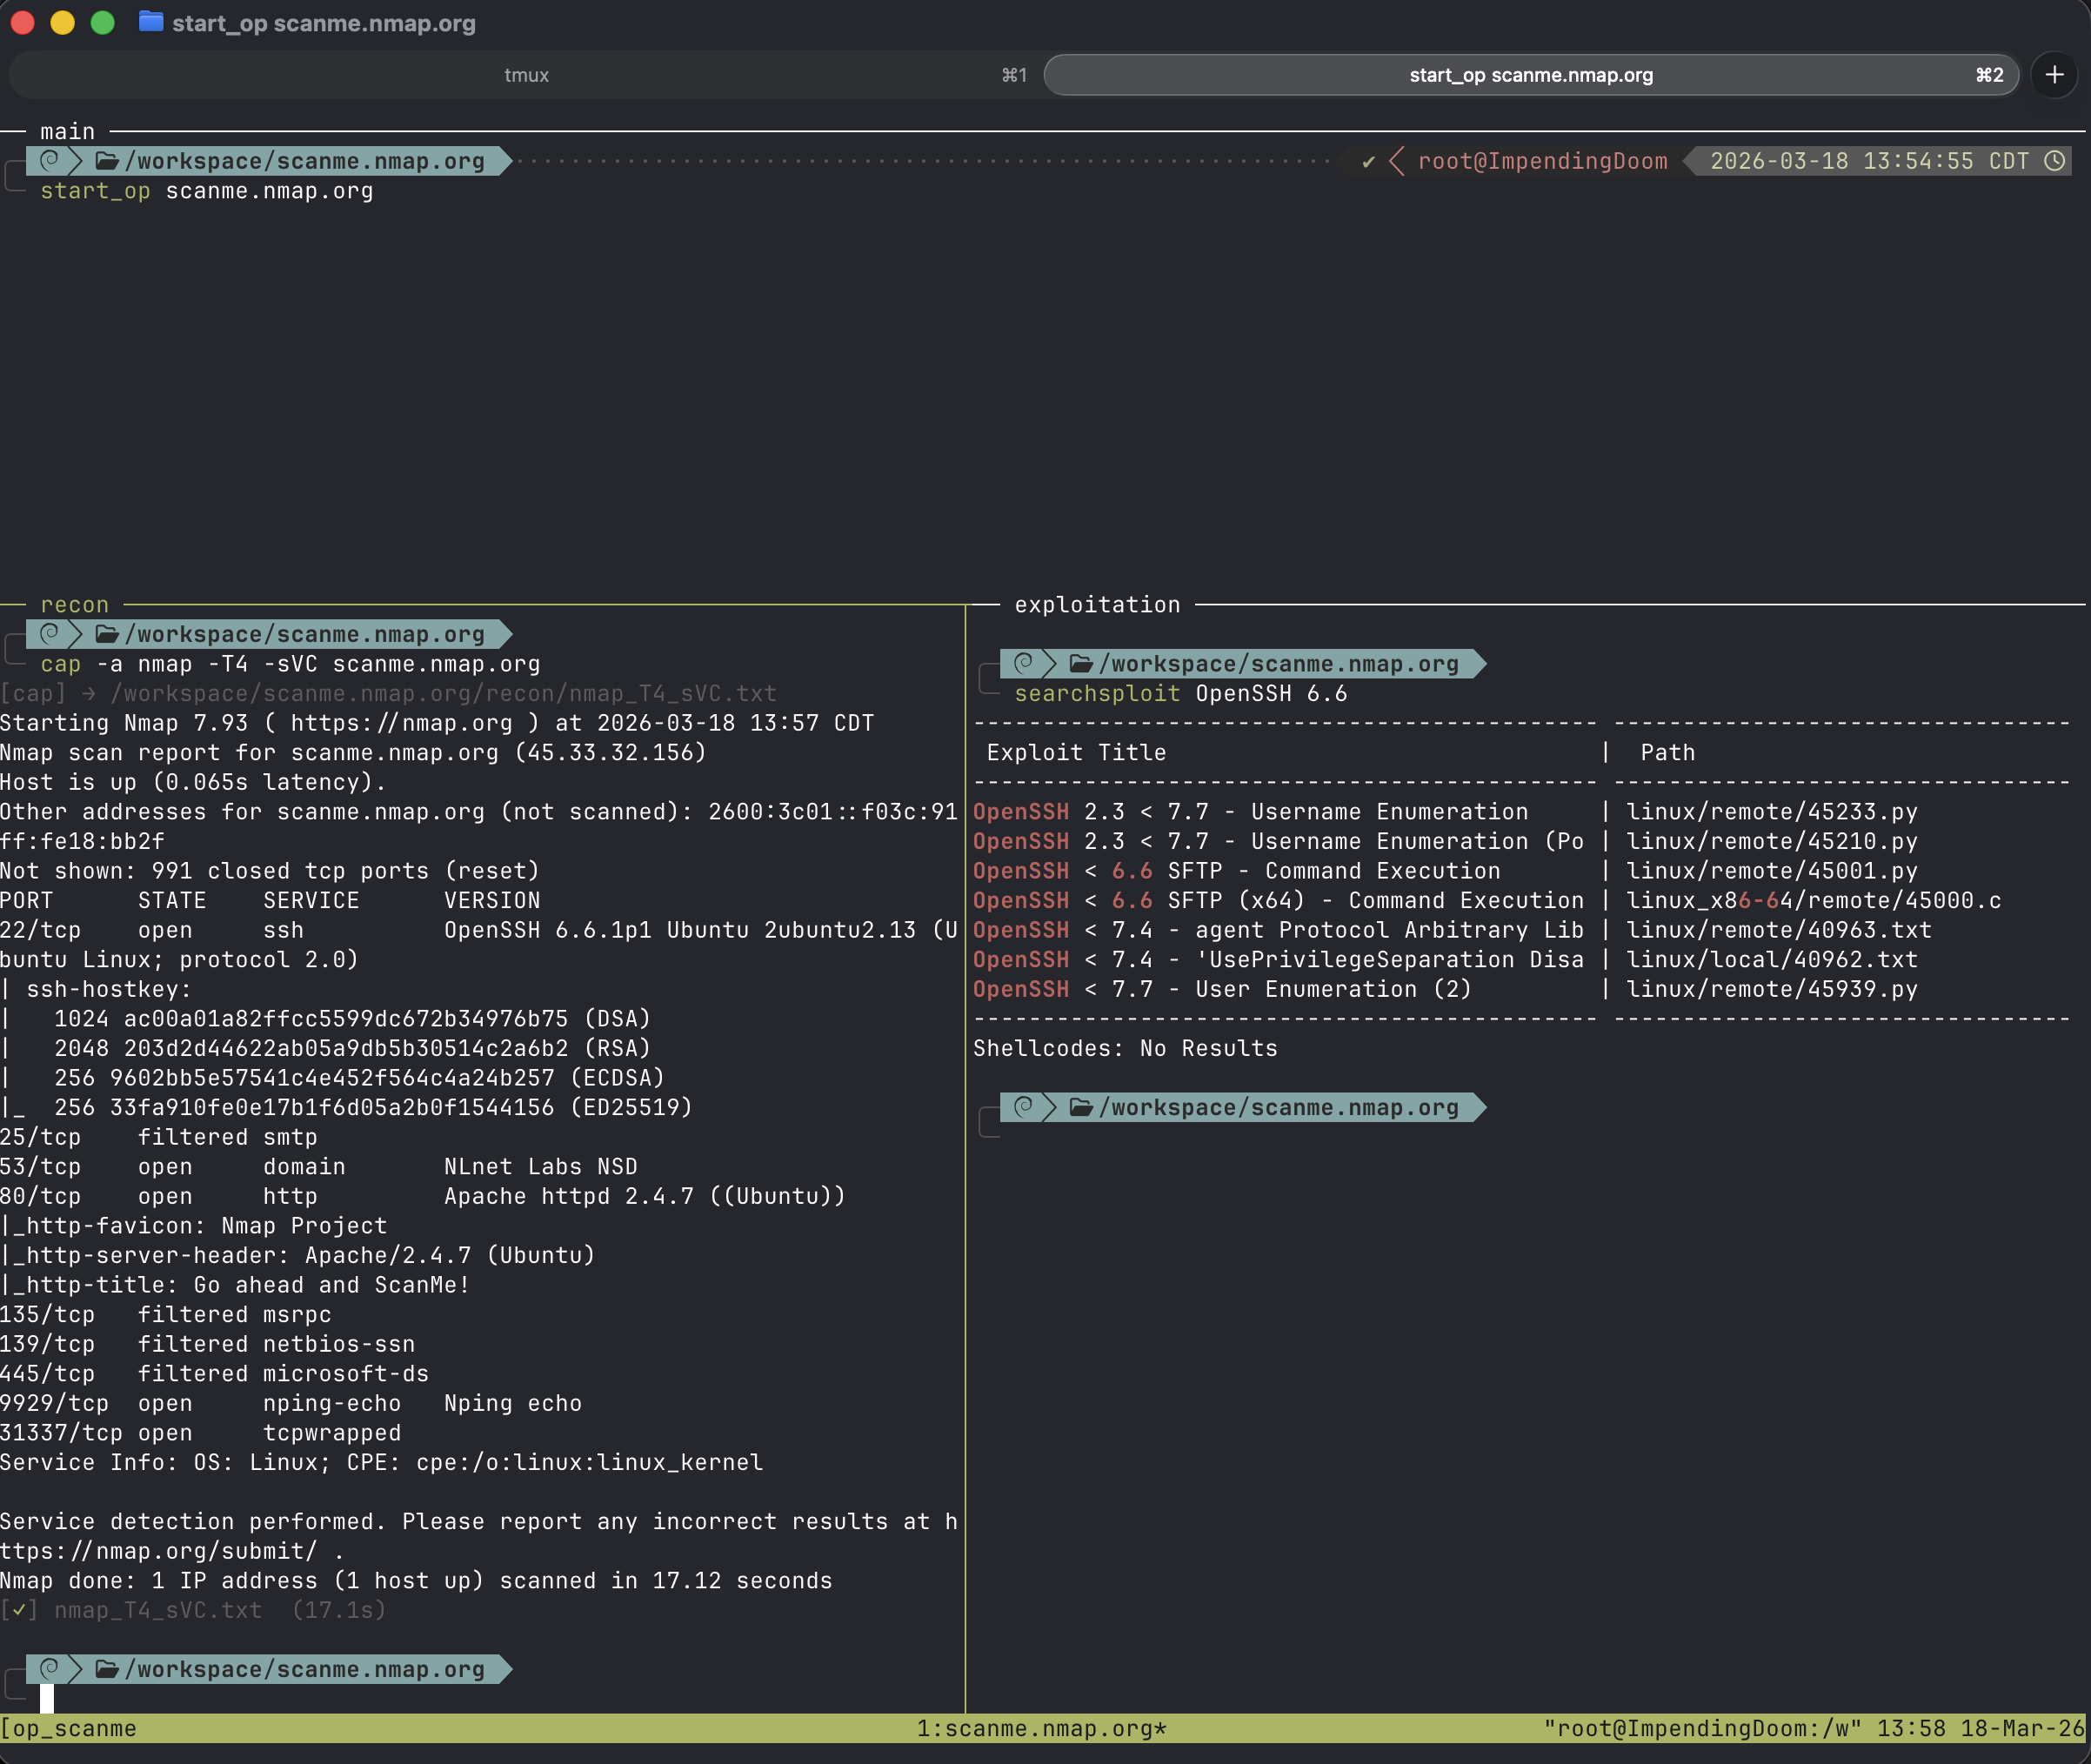 tmux session after start_op — showing the structured panes with the workspace directory visible
Operate
Now I’m running tools with NOCAP handling output capture:
cap nmap -sCV 10.10.10.5            # → recon/nmap_sCV.txt
cap gobuster dir -u http://10.10.10.5 -w /usr/share/seclists/...
                                      # → recon/gobuster_dir.txt
cap loot secretsdump.py CORP/[email protected]
                                      # → loot/secretsdump.txt
The $TARGET variable (set by start_op) tells NOCAP where to route. The tmux session name tells the logging system where to write. Everything is automatic. I think about the target, not the filing system.
The Staging Area
Need to transfer tools to an authorized target? Exegol ships with exegol-resources — a curated library mounted at /opt/resources (its size and contents vary by release):
/opt/resources/
├── windows/
│   ├── mimikatz/
│   ├── chisel.exe
│   ├── ligolo-ng/agent.exe
│   ├── SharpCollection/
│   ├── SysinternalsSuite/
│   ├── PowerSploit/
│   └── PrivescCheck/
├── linux/
│   ├── linPEAS/
│   ├── pspy
│   ├── chisel
│   └── ligolo-ng/agent
└── webshells/
One alias: staging drops me into /opt/resources. No downloading mimikatz mid-engagement. No wondering if you have the right version. It’s pre-staged, version-tracked, and updated with exegol update.
Wrap Up
stop_op 10.10.10.5 archive
Kills the tmux session, archives everything to /workspace/archives/10.10.10.5_20260313_163045.tar.gz. When the engagement is over:
exegol stop clientA
exegol remove clientA
The container is gone, but the engagement data remains in the host workspace by design. My closeout includes verifying the archive, deciding the workspace’s retention or destruction path, removing temporary credentials and VPN material, checking shared resources and shell history, and confirming that no engagement-specific containers or services remain. Containers reduce bleed; disciplined teardown closes the loop.
GUI: X11 vs Desktop Mode
The elephant in the room with any containerized workflow: what about GUI tools? You need Burp Suite, Firefox, BloodHound — tools that don’t run in a terminal.
Exegol handles this two ways.
X11 Forwarding (Default)
X11 sharing is enabled automatically when you start a container. GUI apps launched inside the container display as individual windows on your host desktop. On Linux, this works natively through X11 sockets — fast, seamless, zero configuration.
On macOS, X11 forwarding requires XQuartz, and rendering can be noticeably slower depending on the application and host configuration. For GUI-heavy work, I prefer Exegol’s browser-based desktop mode.
Desktop Mode (Browser-Based)
This is the better option on macOS and Windows. Starting with wrapper v4.3.0, Exegol can serve a full XFCE4 desktop through your browser via noVNC:
exegol start clientA full --desktop
After startup, run exegol info clientA to get the access URL and credentials, then open it in any browser. You get a full desktop environment — taskbar, file manager, Terminator terminal — all inside a browser tab. No XQuartz, no X11 dependencies, no platform-specific headaches.
You can also use a traditional VNC client if you prefer:
exegol start clientA full --desktop-config "vnc:127.0.0.1:5900"
| X11 Forwarding | Desktop Mode | |
|---|---|---|
| Linux | Excellent — use this | Good, but unnecessary |
| macOS | Poor (XQuartz bottleneck) | Good — use this |
| Windows/WSL | Problematic | Good — use this |
| Remote/headless | Requires SSH tunneling | Bind locally or expose through an approved, authenticated tunnel |
| Multi-window | Each app gets its own host window | All apps in one browser tab |
Desktop mode runs well for my workflow. I use it on macOS for anything GUI-heavy — Burp Suite, Firefox for web app testing, and BloodHound for AD visualization. The service binds to localhost by default and uses PAM authentication; I do not expose it directly to an untrusted network. For everything else, I stay in the terminal.
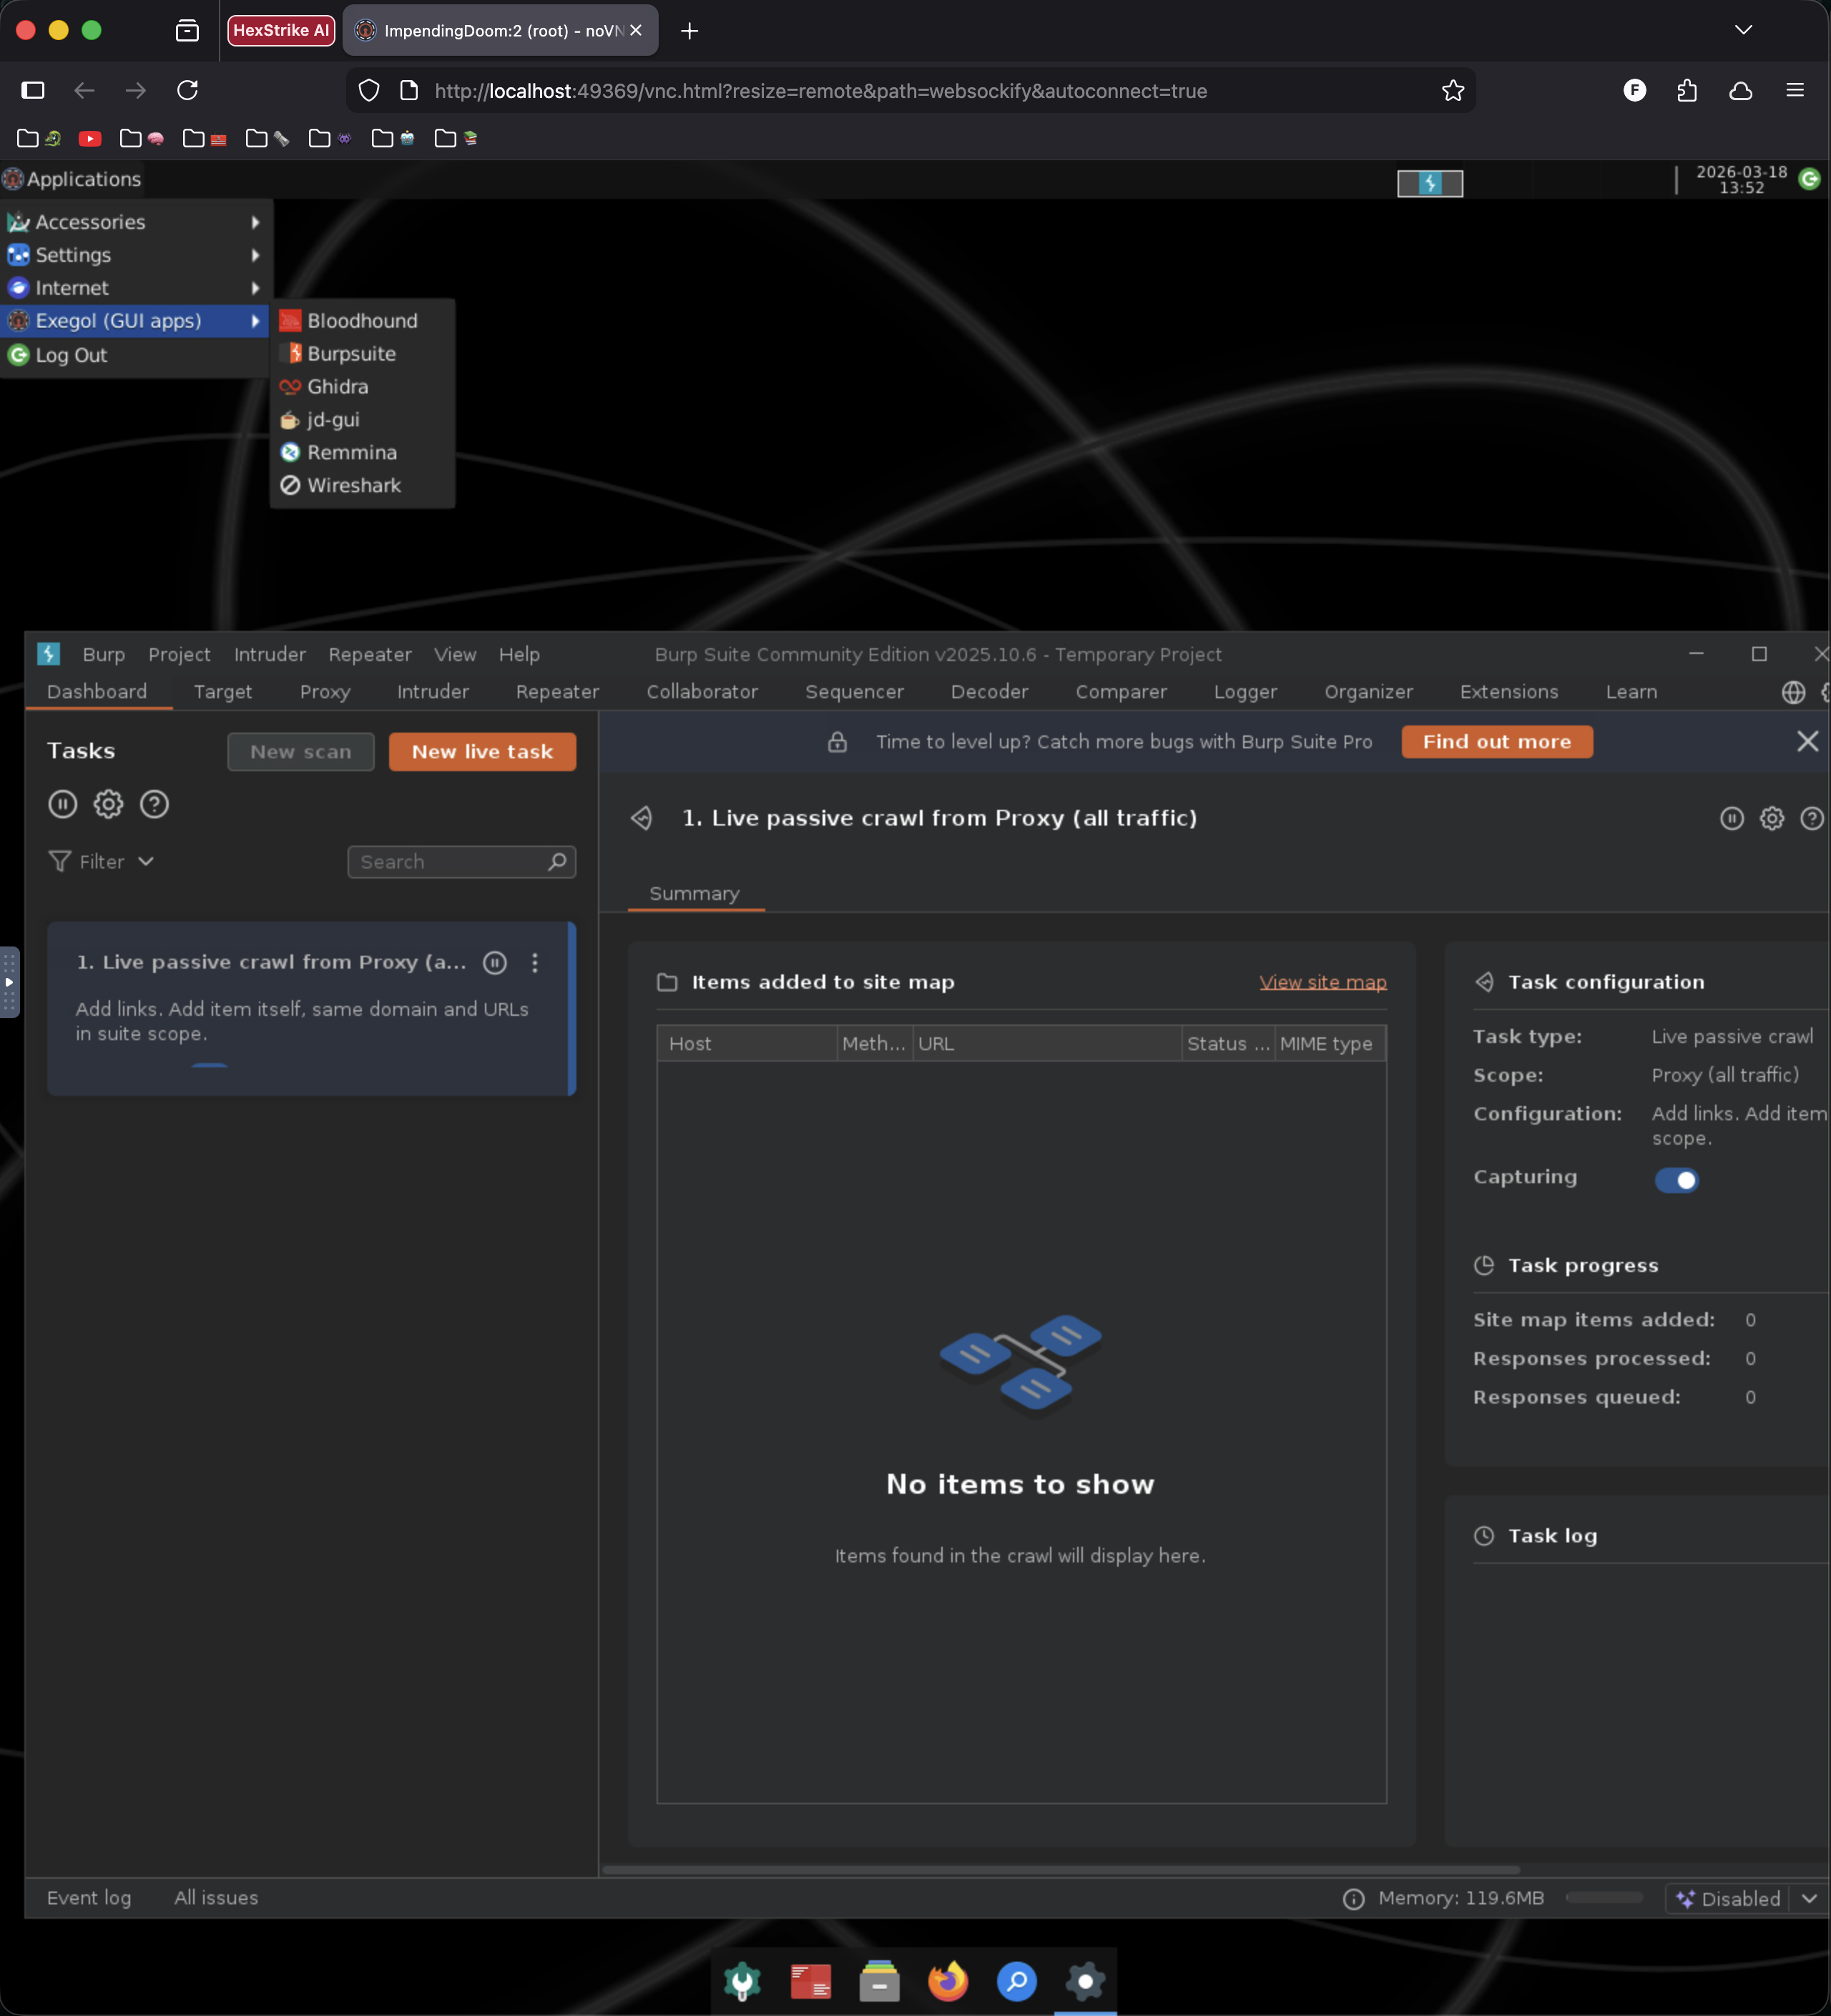 Exegol desktop mode in browser — Burp Suite running inside the XFCE desktop
AI as a Co-Pilot
I covered Claude aliases briefly in the operator workflow post. Inside Exegol, it goes deeper.
My load_user_setup.sh installs Claude Code and deploys a full configuration: a CLAUDE.md with engagement guidelines (authorized targets only, explain reasoning, don’t ask permission for standard recon) and six custom slash commands:
| Command | Purpose |
|---|---|
/recon <ip> |
Run nmap initial + full port scan + analysis |
/enumerate <target> |
Web service enumeration (whatweb, nikto, gobuster) |
/assess |
Begin an HTB Academy assessment or machine |
/explain |
Explain the last command or technique in detail |
/note |
Add a finding to the current Obsidian note |
/flag <flag> |
Document captured flag + summarize attack chain |
Where AI shines is analysis, not execution. I run the scan. NOCAP captures the output. Then I pipe it to Claude to break down what the results mean, what’s interesting, and what to try next. The operator drives — the AI reads the map.
In the example below I run an nmap scan on the target and use NOCAP to write to a log file. I then use cap cat to read the last NOCAP log file and pipe it to an alias for Claude to analyze the nmap results.
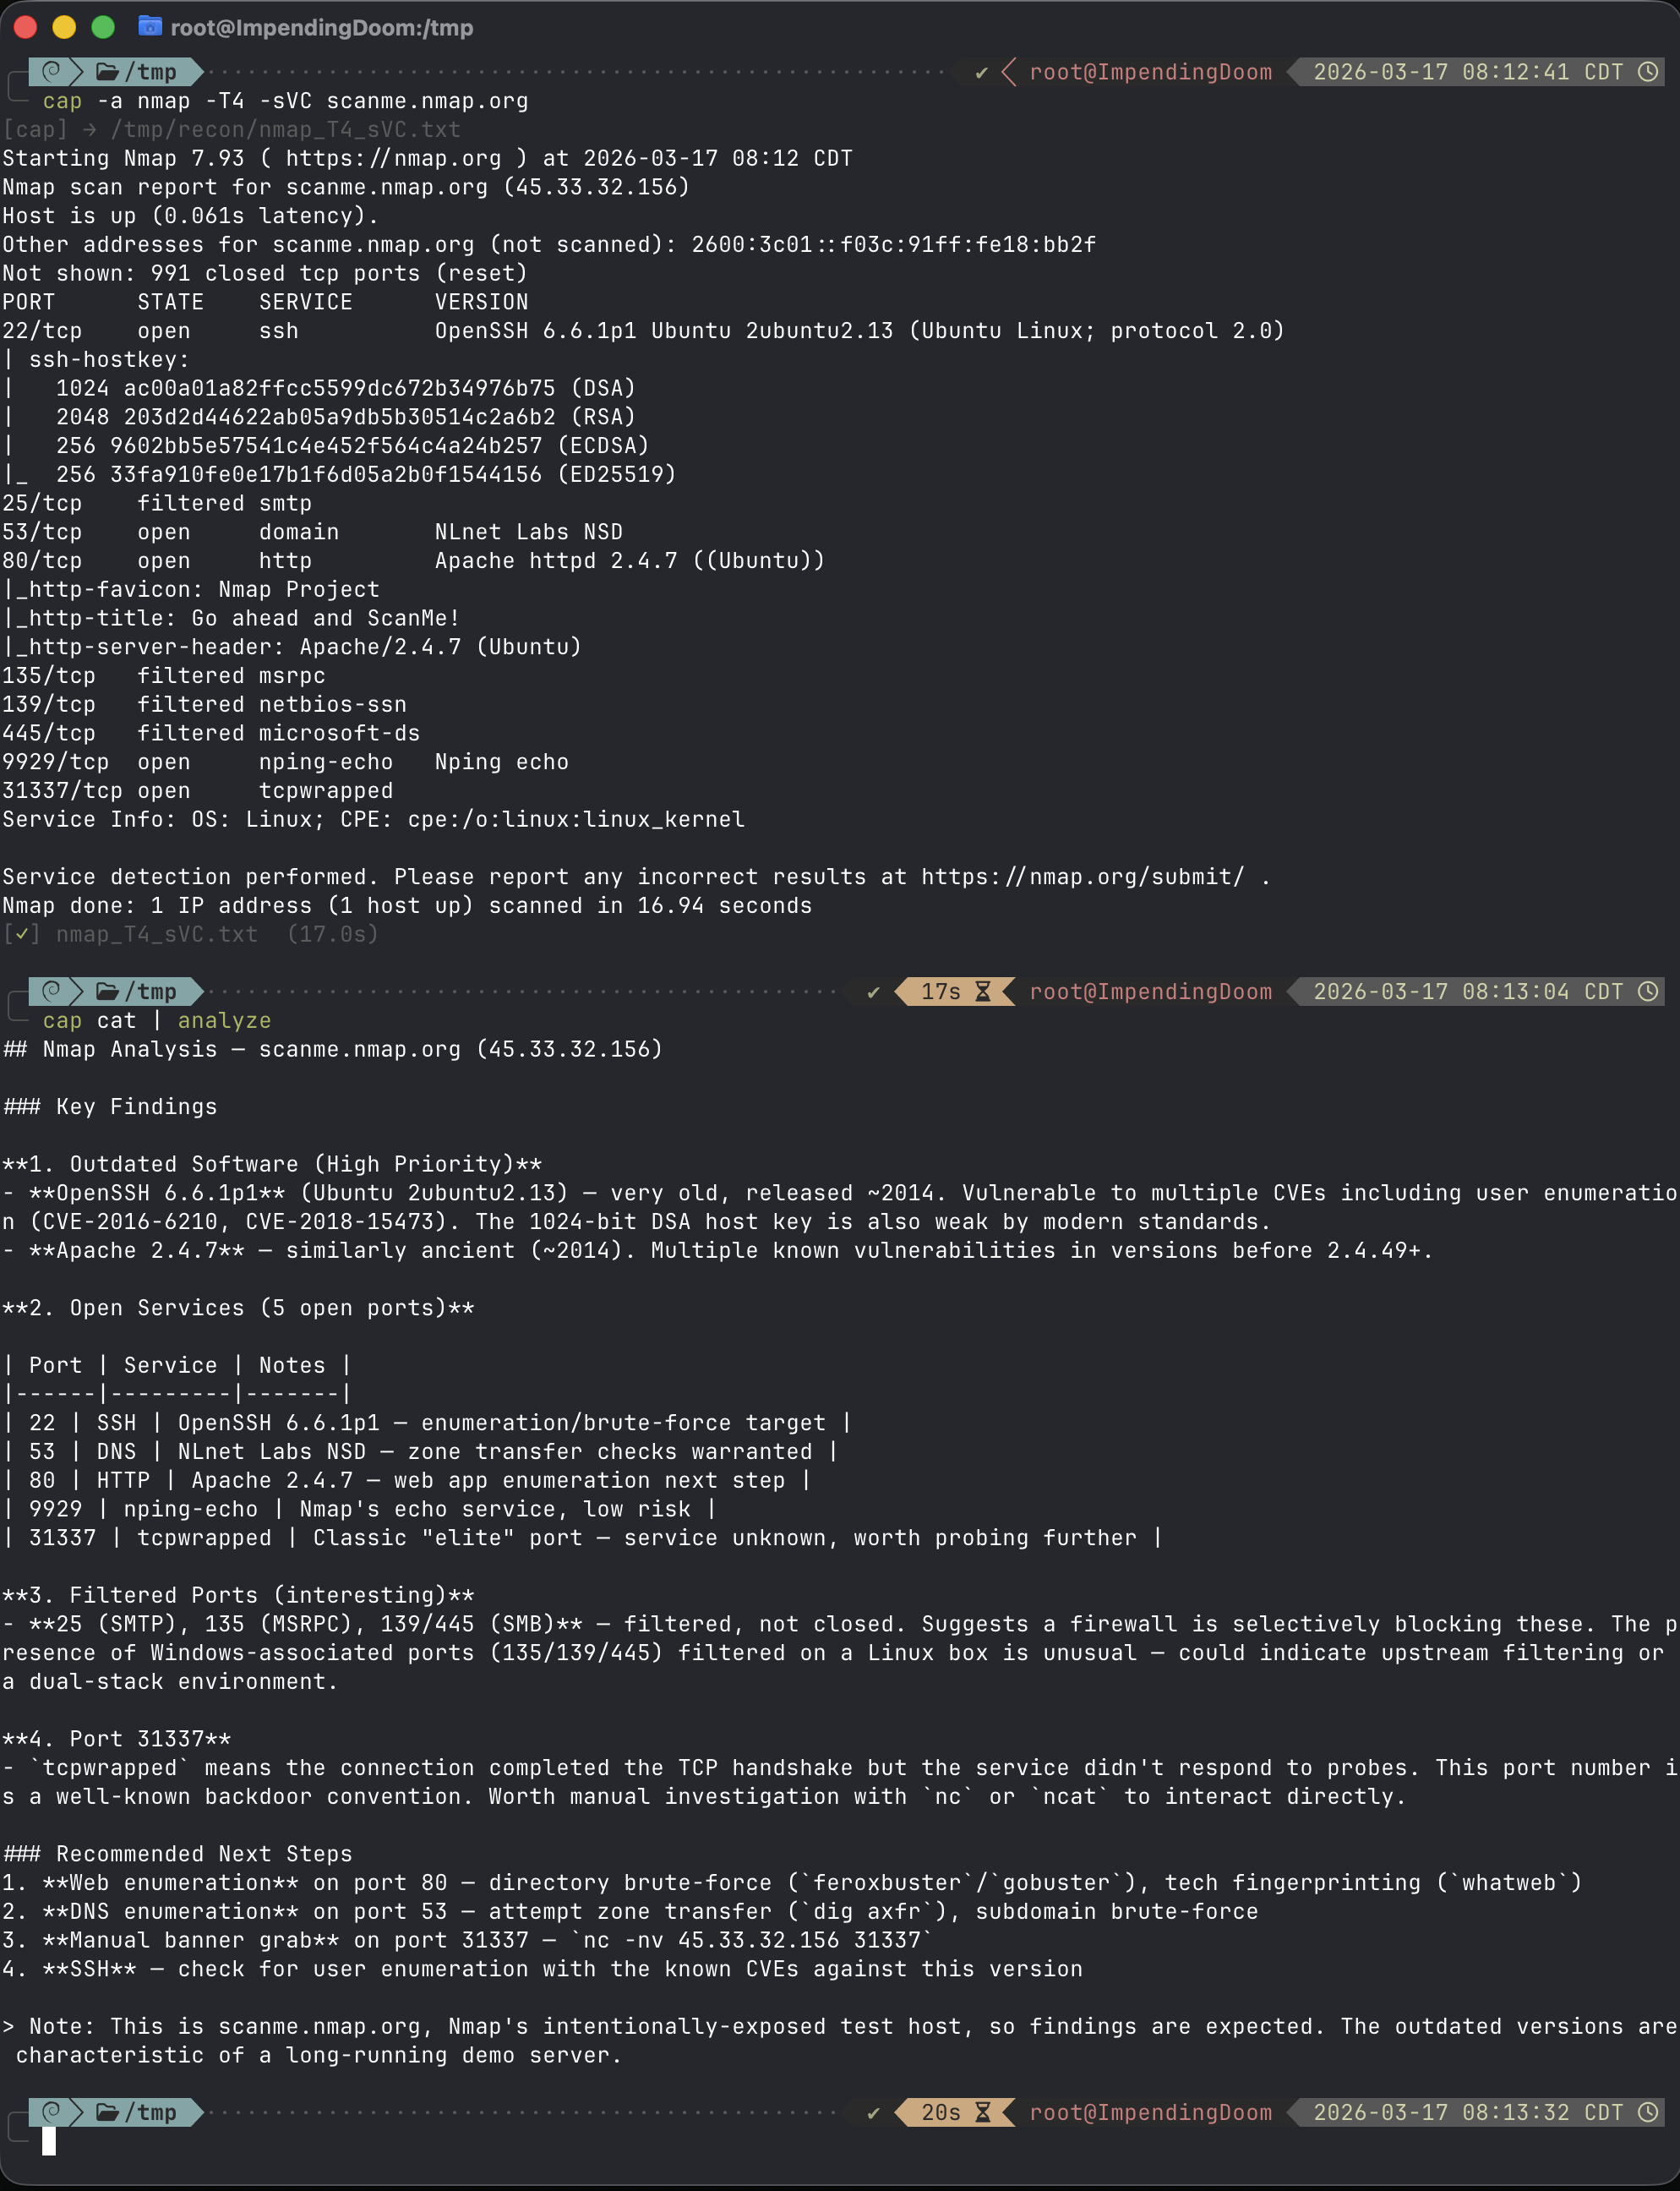 Using Claude Code to analyze nmap results
A Word on Client Data and AI
Before we go further into AI-driven tooling, this needs to be said plainly: do not send client engagement data to cloud AI providers without explicit authorization.
Target IPs, credentials, scan output, internal hostnames, and source code can all be client confidential information. Sending them to a third-party service can create contractual, privacy, or regulatory exposure depending on the engagement terms, the provider configuration, and the client’s industry. Treat AI use like any other external data processor: verify scope, the contract, the data-processing terms, retention controls, and client approval rather than assuming a particular product tier makes the transfer acceptable.
The Practical Answer: Local Models
For authorized workflows that require local processing, Ollama can run a model on the operator system and expose an Anthropic-compatible API to Claude Code. The current quick path is:
ollama launch claude
The equivalent manual configuration is:
export ANTHROPIC_AUTH_TOKEN=ollama
export ANTHROPIC_API_KEY=""
export ANTHROPIC_BASE_URL=http://localhost:11434
claude --model <locally-installed-model>
Running locally does not automatically guarantee that every integration remains local. Avoid cloud-tagged models, web-search tools, remote telemetry, or plugins that can transmit prompts or results. Validate the complete data path before introducing engagement material.
My approach: use AI only when the engagement permits it, keep sensitive data within an approved processing boundary, and reserve public cloud models for sanitized, generic research. Sanitization means more than removing a client name: IPs, hostnames, usernames, source fragments, unique findings, and attack paths can all identify an environment.
The value is in the pattern — operator-directed analysis with explicit data handling — not in a specific model name.
Exegol MCP: What AI-Driven Execution Looks Like
Everything above is AI working inside a container — Claude Code as a co-pilot while you operate. Exegol’s MCP server takes this a step further: your AI assistant controls the containers themselves.
MCP (Model Context Protocol) is the open standard that lets AI assistants call external tools. Exegol ships an MCP server that exposes container management and in-container execution as tools any MCP-compatible client can invoke — Claude Desktop, Claude Code, Cursor, or anything else that speaks the protocol.
What It Can Do
The MCP server exposes two categories of tools:
Orchestration — manage your Exegol environment from natural language:
| Tool | What it does |
|---|---|
list_exegol_containers |
Show all containers with status |
start_container |
Start an existing container; new-container creation remains limited in the current release |
stop_container |
Stop running containers |
list_installed_images |
Show local images |
list_all_images |
Show installed and downloadable images with update status |
download_image |
Pull images from the registry |
In-container execution — run offensive tools without touching a terminal:
| Tool | What it does |
|---|---|
execute_command_in_container |
Run any command inside a container |
execute_remote_command |
Execute on remote systems via SSH, WinRM, SMB, MSSQL, WMI |
list_installed_tools |
Show available security tools by category |
list_installed_exegol_resources |
Show staged resources by target OS |
Setup
Install the MCP server alongside your existing Exegol setup:
pipx install exegol-mcp
On macOS and Windows, Exegol supports running the server over stdio. A compatible client configuration looks like this:
{
  "exegol-mcp": {
        "command": "exegol-mcp",
        "args": [
          "--type",
          "stdio"
        ]
	}
}
On Linux, the current recommendation is to start the server manually with sufficient Docker privileges using its authenticated HTTP transport, then print the client configuration:
exegol-mcp
exegol-mcp --print-config
That configuration points the client to http://127.0.0.1:8000/mcp and includes a bearer token. Do not publish the listener or commit the generated token. Follow the current Exegol MCP setup documentation for the platform you are using.
The Honest Take
MCP-driven execution is impressive, but it is not how I run most engagements. Tool definitions and repeated calls consume context, and operator-entered commands are often faster and easier to audit.
More importantly, Exegol currently describes MCP as suitable for research, testing, CTFs, and safe labs—not ordinary production red-team or penetration-testing work without significant additional controls. Container creation and removal are also listed as incomplete, even though the current tool description says start_container may create a container. Treat creation as limited until the documentation and implementation converge.
Where MCP does shine is controlled lab setup, repeatable CTF workflows, and learning tool syntax. A local model can participate when the client supports MCP and reliable tool calling, but model size alone is not a security or quality guarantee. Authorization, scope enforcement, network isolation, human review, and durable execution logs remain operator responsibilities.
My rule is simple: automate repeatable mechanics; augment judgment. The operator retains decision authority.
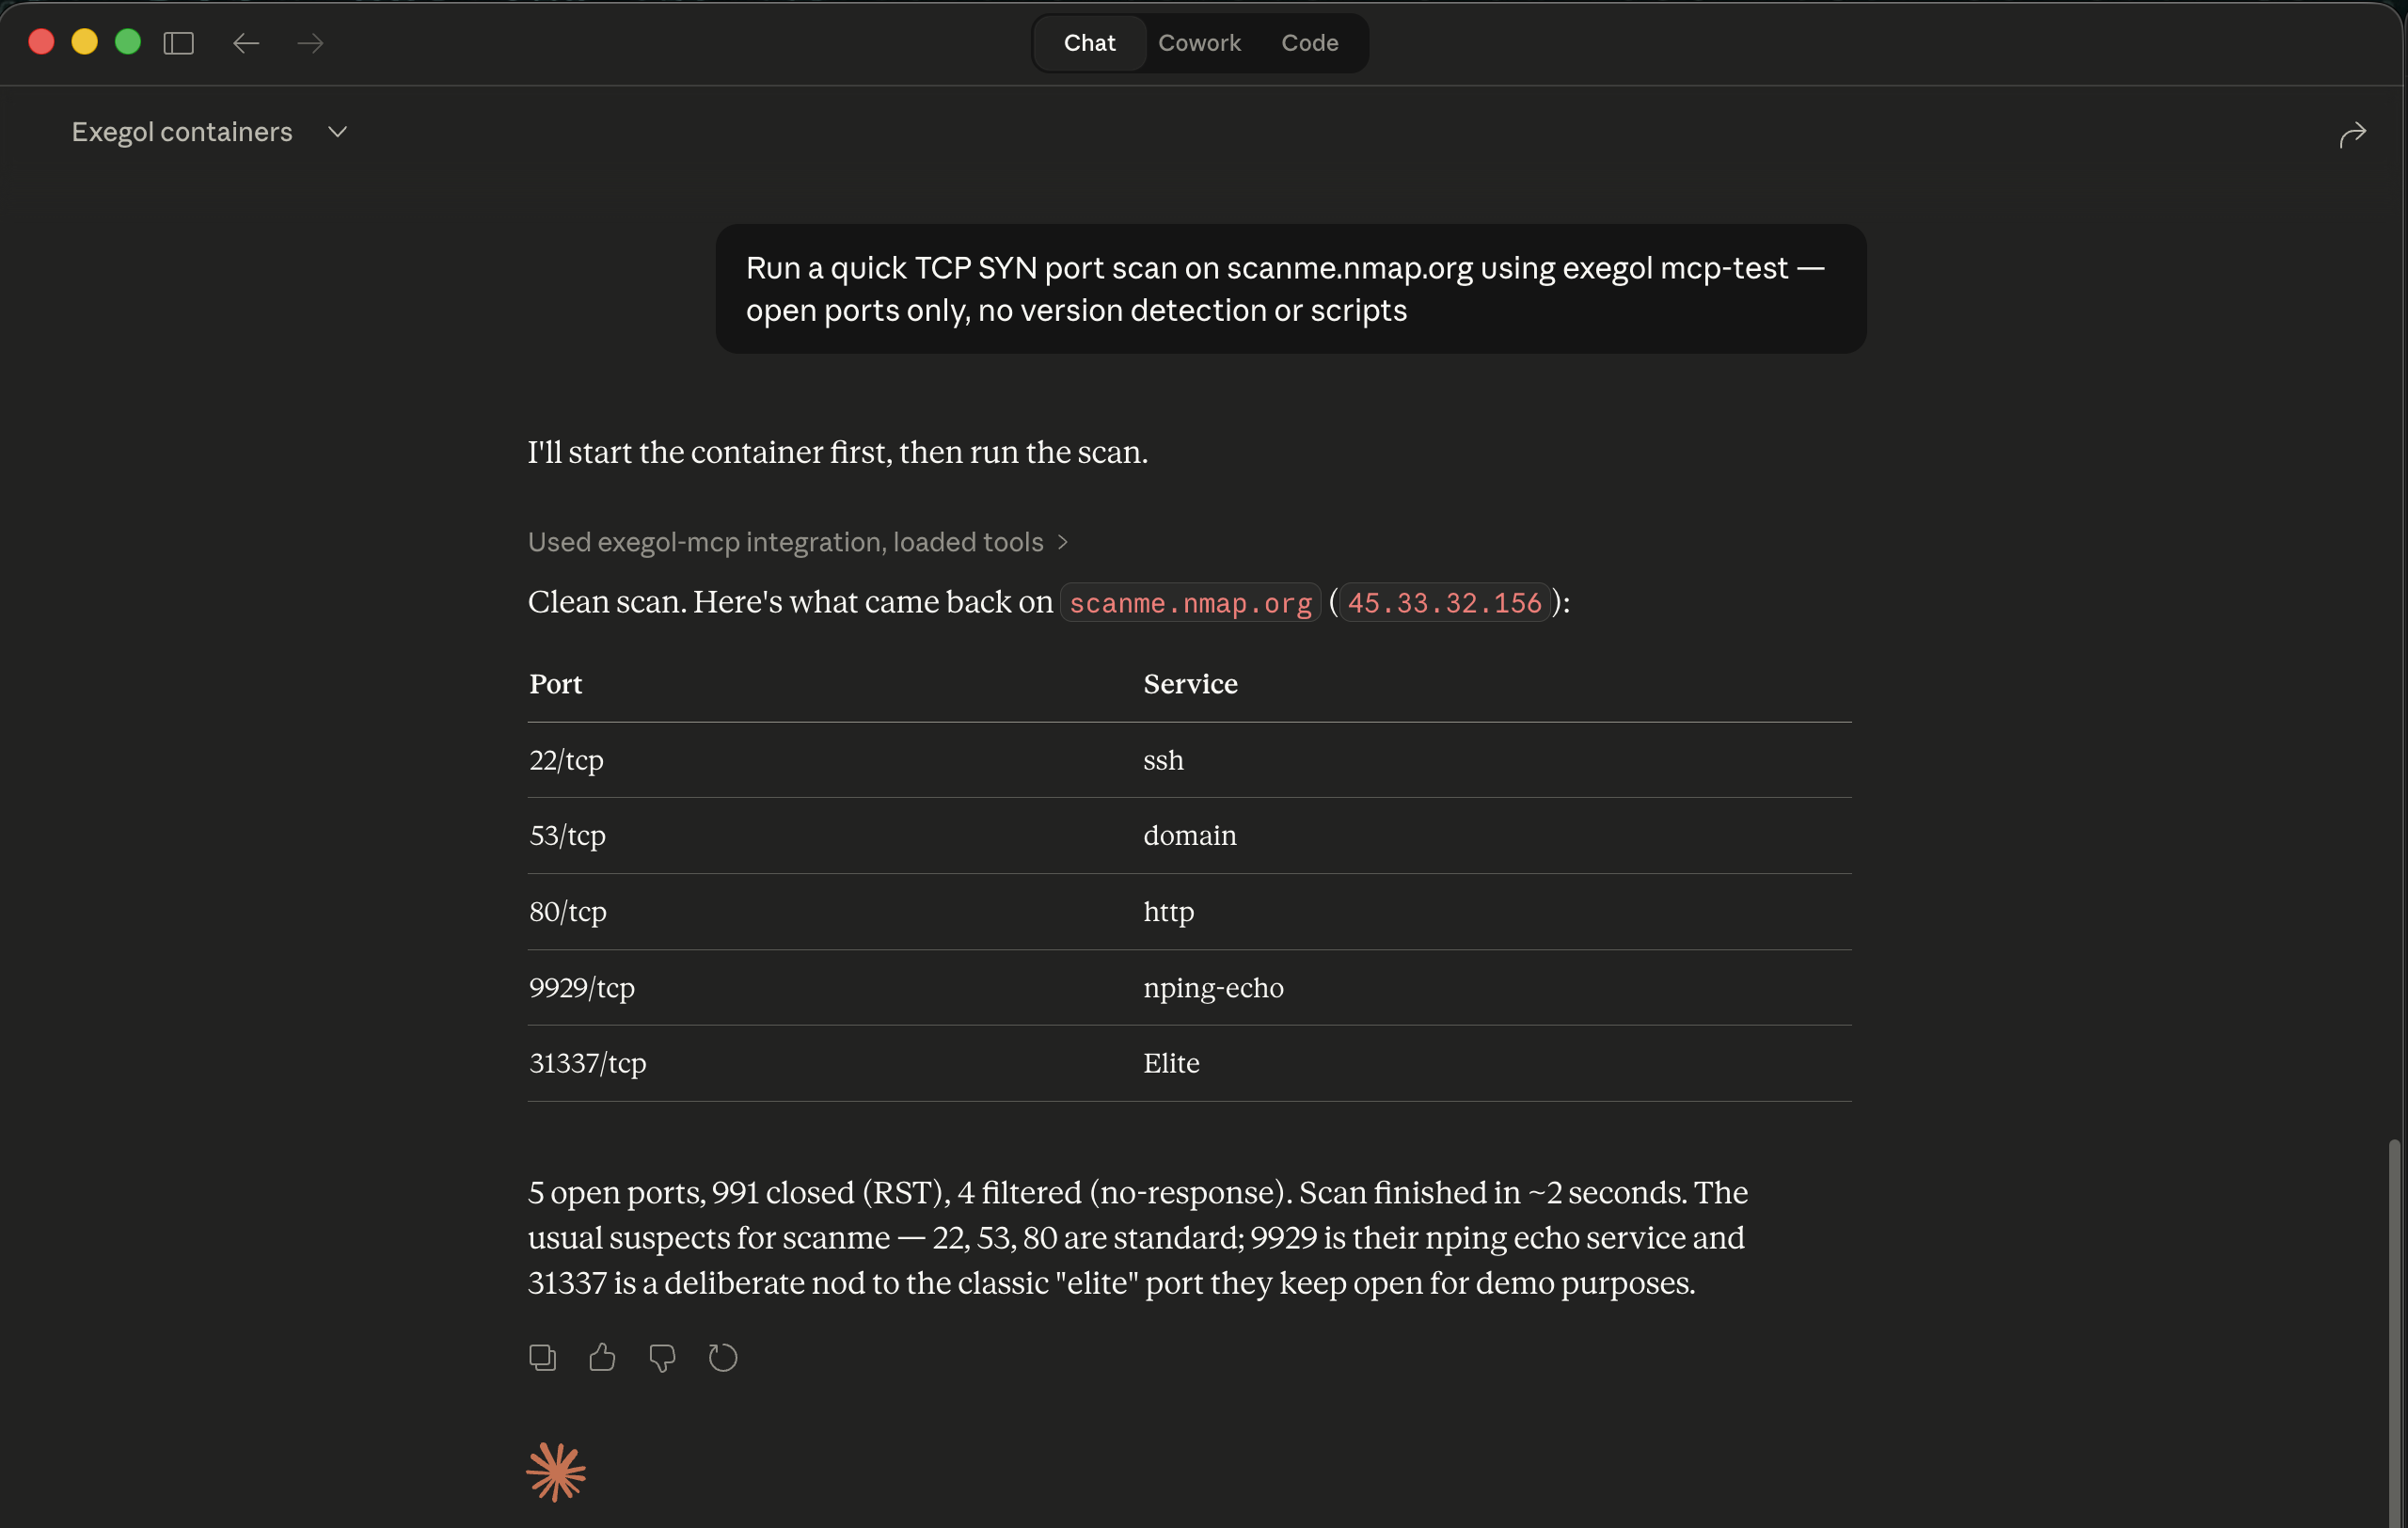 Using Exegol MCP with Claude Desktop to scan a target
Getting Started
If you want to try this:
# Install the wrapper
pipx install exegol

# Pull an image
# Community tier: exegol install free
# Pro/Enterprise: exegol install full (or ad, web, osint, light)
exegol install free

# Start your first container
exegol start test free
You’ll land in a fully equipped security environment with hundreds of pre-installed tools. Within Nmap’s published testing rules, you can run a light scan against scanme.nmap.org to verify the environment:
nmap -sCV scanme.nmap.org
On macOS or Windows, add --desktop for browser-based GUI access — no XQuartz needed.
From there, start customizing ~/.exegol/my-resources/:
- Add your aliases and functions to
setup/zsh/zshrc - Drop custom scripts into
bin/ - Add first-boot installs to
setup/load_user_setup.sh - Git-init the directory so your customizations are version-controlled from day one
The official docs on my-resources cover the directory structure and supported hooks. Start small: add aliases or commands through setup/zsh/zshrc, add one or two pinned installs to the setup script, and build from there. Do not replace Exegol-managed files such as /root/.zshrc; doing so can prevent upstream updates from applying.
The Takeaway
BackTrack and Kali gave me a home for fifteen years. Exegol gave me a system for building homes on demand.
The pattern is: treat your environment as code. My operating environment is roughly 1,200 lines of shell configuration, a 200-line bootstrap script, and a directory of tool configs—all version-controlled. The image supplies the maintained base; pinned bootstrap inputs and my-resources supply the operator layer.
Every engagement starts from a known base. Every customization is reviewable and portable. When the engagement ends, the disposable container disappears; a closeout checklist handles the host-mounted data and other persistent state that containers intentionally leave behind.
If you’re still maintaining a single Kali install across multiple clients, I’m not going to tell you it’s wrong. But there’s a better way — and once you see it, you won’t go back.
Your environment should be as deliberate as your tradecraft. Make it reproducible, make it portable, make it yours.